


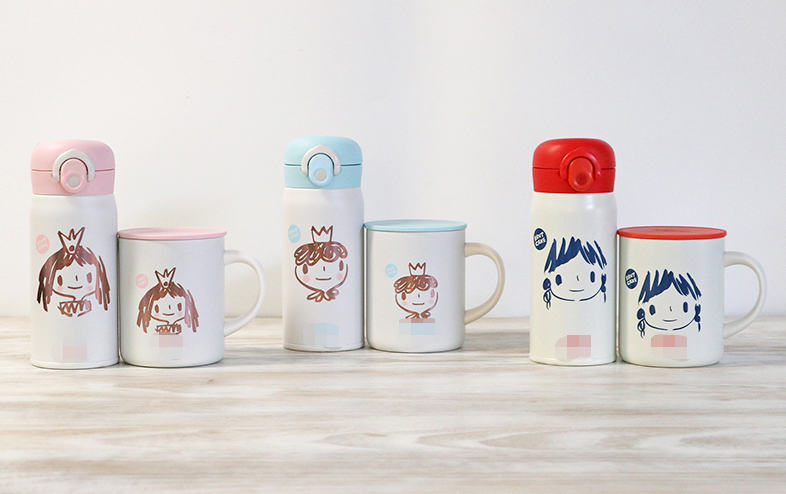
A thermos cup is almost a must-have item for everyone. Children can drink hot water at any time to replenish water, and middle-aged and elderly people can soak red dates and wolfberry for health care. However, unqualified thermos cups may have safety hazards, excessive heavy metals, etc.
The national mandatory standard GB/T 40355-2021 is applicable to daily stainless steel vacuum insulation containers in contact with food. Specifies the terms and definitions, classification and specifications, requirements, test methods, inspection rules, signs, labels, instructions for use and packaging, transportation and storage of stainless steel vacuum insulated containers. The standard will be officially implemented on March 1, 2022.
Stainless steel thermos cup (bottle, pot) inspection
1.Appearance
2. Stainless steel material
3. Volume deviation
4. Insulation efficiency
5.Stability
6.Impact resistance
7.Sealing
8.Sealing parts and hot water odor
9.Hot water resistance of rubber parts
10.Installation strength of handle and lifting ring
11.Strength of straps and slings
12.Coating adhesion
13.Adhesion of printed text and patterns on the surface
14.The screwing strength of the sealing cap (plug)
15.Usage performance
1.Appearance
-The surface of the thermos cup (bottle, pot) should be clean and without obvious scratches. Parts accessible to hands should be free of burrs.
-The welded part should be smooth and clean, without pores, cracks or burrs.
-The coating should not be exposed, peeling or rusty.
-Printed text and graphics should be clear and complete.
2.Stainless steel material
Inner tank and accessories materials: The inner tank and stainless steel accessories that are in direct contact with food should be made of 12Cr18Ni9, 06Cr19Ni10 grade stainless steel materials, or other stainless steel materials with corrosion resistance not lower than the above specified grades.
Shell material: The shell should be made of austenitic stainless steel.
3.Volume deviation
The volume deviation of the thermos cup (bottle, pot) should be within ±5% of the nominal volume.
4.Insulation efficiency
The insulation efficiency level of thermos cups (bottles, pots) is divided into five levels. Level I is the highest and level V is the lowest, as shown in the table below.
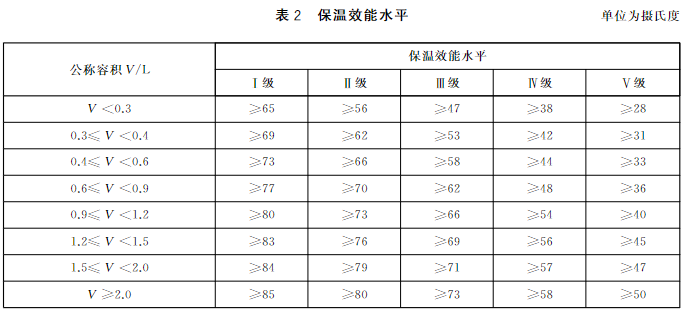
The main body of the thermos cup (bottle, pot) is left exposed for more than 30 minutes at the specified test environment temperature and filled with water above 96°C. The actual measured temperature of the water in the main body of the thermos cup (bottle, pot) reaches (95±1)°C. , close the original cover (stopper), and after 6h±5min, measure the temperature of the water in the main body of the thermos cup (bottle, pot). It is required that thermos cups (bottles and pots) with inner plugs should not be lower than level II; thermos cups (bottles and pots) without inner plugs should not be lower than level V.
5.Stability
Under normal use, fill the thermos cup (bottle, pot) with water, place it on a non-slip straight wooden board tilted at 15°, and observe whether it topples over.
6.Impact resistance
Fill the thermos cup (bottle, pot) with room temperature water, hang it vertically at a height of 400mm with a lanyard, and drop it to a horizontally fixed hard board with a thickness of more than 30mm in a static state to check for cracks and damage. At the same time, check whether the thermal insulation performance meets the corresponding regulations.
7.Sealing
Put 50% of the volume of hot water above 90℃ into the main body of the thermos cup (bottle, pot), seal it with the original cap (stopper), with the mouth upward, swing up and down 10 times at a frequency of 1 time/second and an amplitude of 500mm. , check for leaks.
8.Sealing parts and hot water odor
After cleaning the thermos cup (bottle, pot) with warm water between 40℃ and 60℃, fill it with hot water above 90℃, close the original lid (stopper), and leave it for 30 minutes. Check whether the sealing parts and the hot water have any peculiar smell.
9.Hot water resistance of rubber parts
Place the rubber parts in the container of the reflux condensation device, boil slightly for 4 hours, then take them out and check whether they are sticky. After leaving it for 2 hours, check with the naked eye whether there is any obvious deformation in appearance.
10.Installation strength of handle and lifting ring
Hang the thermos cup (bottle, pot) through the handle or lifting ring, and put a weight equal to 6 times the weight of the thermos cup (bottle, pot) filled with water (including all accessories), and hang it lightly on the thermos cup (including all accessories). keep it on for 5 minutes, and check whether there is a handle or lifting ring.
11.Strength of straps and slings
Strap strength test: unfold the strap to its longest point, then hang the thermos cup (bottle, pot) through the strap, and use a weight equivalent to 10 times the weight of the thermos cup (bottle, pot) filled with water (including all accessories), such as If not shown, hang it lightly on the thermos cup (bottle, pot) and keep it for 5 minutes. Check whether the straps, slings and their connections are slipping or broken.
Sling strength test: hang the thermos cup (bottle, pot) through the sling, use a weight equivalent to 10 times the weight of the thermos cup (bottle, pot) filled with water (including all accessories), and hang it lightly on the thermos cup in the figure (bottle, pot), keep it for 5 minutes, and check the sling and its connections.
12.Coating adhesion
Use a single-edged cutting tool with a blade angle of 20° to 30° and a blade thickness of (0.43±0.03) mm (as shown below), apply vertical and even force on the surface of the coating to be tested, and scratch 100 (10× 10) 1mm2 checkerboard grid, and stick a pressure-sensitive adhesive tape with a width of 25mm and an adhesion force of (10±1) N/25mm on it, and then peel off the tape forcefully in a direction at right angles to the surface, and calculate the amount of tape that has not been peeled off The number of remaining checkerboard grids, it is generally required that the coating should retain more than 92 checkerboard grids
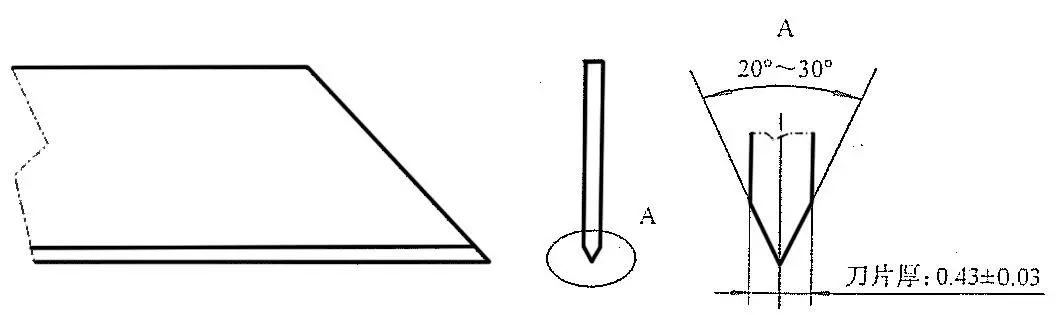
Schematic diagram of single edge cutting tool
13.Adhesion of printed text and patterns on the surface
On the text and pattern, stick a pressure-sensitive adhesive tape with a width of 25mm and an adhesion strength of (10±1) N/25mm. Then peel off the tape forcefully at right angles to the surface and check whether it has fallen off.
14.The screwing strength of the sealing cap (plug)
First tighten the cover (plug) by hand, then apply a torque of 3 N·m to the cover (plug), and check whether the thread has sliding teeth.
15.Usage performance
Manually and visually inspect whether the moving parts of the thermos cup (bottle, pot) are firmly installed, move flexibly, and function normally.
Post time: Nov-25-2023